13 October to 15 November 2024 - end date approximate
 Our second
day in Italy was a full day travelling to Tarquinia and the mosaic garden, but our
looms were screwed together. YAY! Day
three dawned with dry looms (finally!), a half-day trip to the waterfall, and
it looked like we were ready to weave! Some
yarn was dyed. Most of us had our designs. We had measured and
marked inches (and quarter and half inches) on the top and bottom horizontal
bars of our looms. We were all set to
learn how
Our second
day in Italy was a full day travelling to Tarquinia and the mosaic garden, but our
looms were screwed together. YAY! Day
three dawned with dry looms (finally!), a half-day trip to the waterfall, and
it looked like we were ready to weave! Some
yarn was dyed. Most of us had our designs. We had measured and
marked inches (and quarter and half inches) on the top and bottom horizontal
bars of our looms. We were all set to
learn how  to do tapestry weaving, which is different from basic weaving.
First we had to "warp the loom." Basically, the warp is the vertical threads on a loom, and they are stationary. The weft is the horizontal threads (we used yarn) that weaves back and forth across the warp to make the fabric or tapestry.
In our case,
there was measuring and making sure we had ten warp threads per  inch.
Tying the beginning cotton twine to the loom, looping around and counting as we
go, making sure there are enough ups and downs to create the width of the
tapestry. Then tightly tying the end of the warp twine to the loom, and
carefully moving the threads so they are fairly evenly spaced at the top and
bottom of the loom.
inch.
Tying the beginning cotton twine to the loom, looping around and counting as we
go, making sure there are enough ups and downs to create the width of the
tapestry. Then tightly tying the end of the warp twine to the loom, and
carefully moving the threads so they are fairly evenly spaced at the top and
bottom of the loom.
There's also
a weird twining thing we had to do across the bottom of the warp threads.
Because our looms were tubing, this gave us space between the warp threads, one
being over the tubing and  one under. This makes it easier to know which
thread to go over or under to create the weave.
The weird twine thing is supposed to make the warp threads, the overs
and the unders, on the same plane. Okay, that part made perfect sense.
Plus the tight horizontal line is kind of the base for the weft threads.
Also made sense. I just don't know what it's called, and I also found out
I don't do it well.
one under. This makes it easier to know which
thread to go over or under to create the weave.
The weird twine thing is supposed to make the warp threads, the overs
and the unders, on the same plane. Okay, that part made perfect sense.
Plus the tight horizontal line is kind of the base for the weft threads.
Also made sense. I just don't know what it's called, and I also found out
I don't do it well.
It involved
a long piece of warp thread folded in half and attached to one upright on the
loom. Then that is woven  horizontally between the vertical warp
threads. The doubled thread is woven one over and one under each warp
thread, with two twists between. Yeah, I made a total mess of that.
When someone tells me to twist two threads together, I assume one twist is
360º. Turns out that 360º is two twists. Maybe. I’m still a
little confused. I definitely ended up
with uneven twists between warps, so they were no longer evenly spaced.
horizontally between the vertical warp
threads. The doubled thread is woven one over and one under each warp
thread, with two twists between. Yeah, I made a total mess of that.
When someone tells me to twist two threads together, I assume one twist is
360º. Turns out that 360º is two twists. Maybe. I’m still a
little confused. I definitely ended up
with uneven twists between warps, so they were no longer evenly spaced.
I botched it
so badly, Shelley redid mine. You know it's bad when the teacher does it
for  the student.
Anyway, we began weaving!
Well, before we could weave, we needed to draw the design on the actual warp threads. This meant putting my drawing under the warp, and using a Sharpie (or other small point permanent marker) to draw the picture. My design had a lot of straight edges, so I just used cardboard as a straight edge since I didn’t have a ruler.
 Then we began
weaving. Going from left to right is
easy, the warp threads are separated for this weaving direction by the tube
used to make the loom. But there isn’t a
device to automatically switch which threads are over and unders, which happens
on large looms for basic weaving. So going
from right to left meant picking up each “under” thread one by one,
Then we began
weaving. Going from left to right is
easy, the warp threads are separated for this weaving direction by the tube
used to make the loom. But there isn’t a
device to automatically switch which threads are over and unders, which happens
on large looms for basic weaving. So going
from right to left meant picking up each “under” thread one by one,  holding
them in the right hand until we have maybe ten or fifteen of them, and then
pass the yarn, the weft, through them.
Yes, slow and tedious!
holding
them in the right hand until we have maybe ten or fifteen of them, and then
pass the yarn, the weft, through them.
Yes, slow and tedious!
But there
are a few things that made it easier.
First, in order to create a design, it’s okay to work in sections. The weaving doesn’t need to be totally
horizontal across the entire width of the piece, it could be one section of
horizontal in one color. Then another
section can be woven next to it. This
was very good  news, because the first day of weaving I only had my indigo blue
yarn, and my white yarn. It was another
two days until my cochineal red was dyed and then dry enough to use it for
weaving!
news, because the first day of weaving I only had my indigo blue
yarn, and my white yarn. It was another
two days until my cochineal red was dyed and then dry enough to use it for
weaving!
So, there
are special tricky ways to weave but change colors for different parts of the
design without leaving a slit in the weaving.
Normally this means interlocking the two yarns, and it makes a tiny
sawtooth sort of design. But I 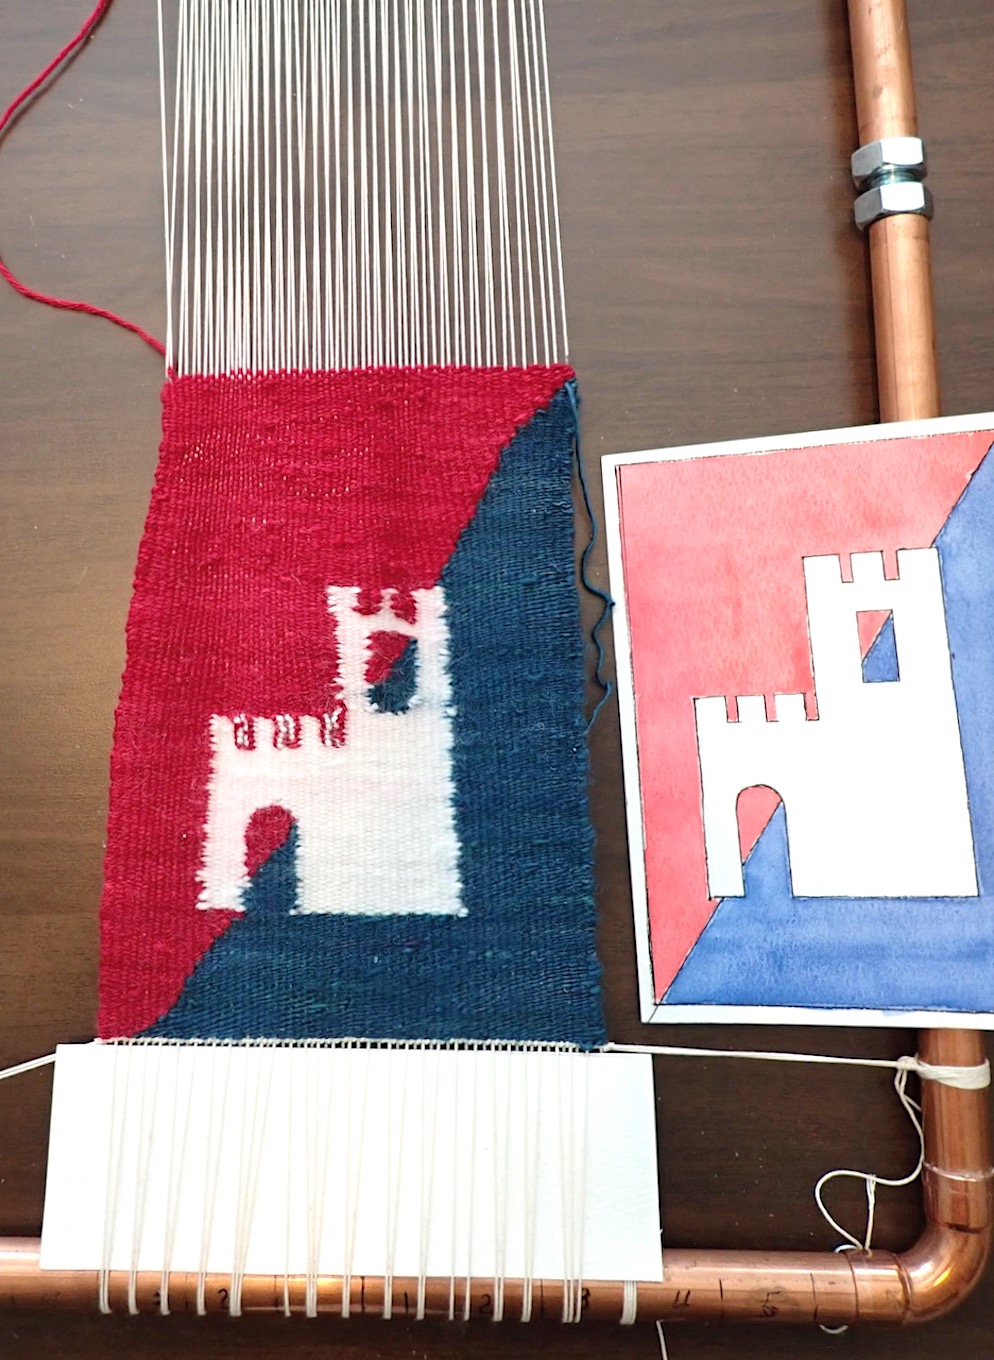 was not
good at this tricky color change, so my tower sides got a little crooked, as
did the doorway. My lower tower looks
like it has lights between the crenellations in the roof. Eh, this was my learning piece, so I wasn’t
going to be all perfectionist about it.
But, well, it is a bit frustrating when things aren’t working the way
they really should.
was not
good at this tricky color change, so my tower sides got a little crooked, as
did the doorway. My lower tower looks
like it has lights between the crenellations in the roof. Eh, this was my learning piece, so I wasn’t
going to be all perfectionist about it.
But, well, it is a bit frustrating when things aren’t working the way
they really should.
Eventually I
kind of got the hang of things. Certain
parts worked fine, like my diagonal line.
Other parts are decidedly wonky, and the  tower looks a bit like it’s shaking
in an earthquake! (Shelley’s husband is
the one who came up with that description, and it’s very apt!)
tower looks a bit like it’s shaking
in an earthquake! (Shelley’s husband is
the one who came up with that description, and it’s very apt!)
Most of us wove every afternoon, after mornings spent exploring various towns as described in the previous blogs. (Our dyers continued to dye, and I want to devote a separate blog to the gorgeous yarns they created.) Our last day, 20 October, was a Sunday and we were scheduled to explore Terni. Most of us opted to stay and do more weaving, so we could be as close to finished as possible.
My piece was just about half done by the time our ten day class was finished, so I packed the entire loom in my luggage, along with the small balls of yarn. (I wrapped the weaving section in paper to make sure my clothes and such didn't unweave anything!) Definitely made my luggage heavier, along with my black truffle products – my luggage leaving Italy was fifteen pounds heavier than when I arrived!
I managed to finish my piece in Tucson, and tied off the warp threads using the Maori technique. Different cultures have different weaving techniques. Modern weaving borrows from those many cultures, but tends to use the names of the original cultures for those specific techniques.
Yes, the left side got extremely crooked. There are ways to “bubble” the weft yarn so it doesn’t pull, but apparently I didn’t leave enough slack to keep it nice and even. As I said, this was all a learning process for me.
Last thing that is a bit odd about tapestry weaving – weft yarn is attached to the warp threads with a loop around and under technique, and the short end is left hanging. Every time a new color is added, or more yarn of the same color is added, there’s a little short end hanging on the back. This is a weird French tapestry technique; other cultures don’t do this, and there are ways to prevent the woven yarn from coming undone. But I’ll talk about that in another blog.
So I have my first little tapestry. I’ll eventually sew a cotton fabric on the back to cover those hanging yarn bits, as well as the warp threads.
All in all, it was fun. It was interesting. Not sure I’ll make tapestry weaving my new medium, but it’s always good to learn something totally new.


Love your design and the colors. I would most definitely be one that the teacher would take over for, too! It’s all a learning experience. Thanks for sharing!
ReplyDeleteHugs
Barb
1cd